|
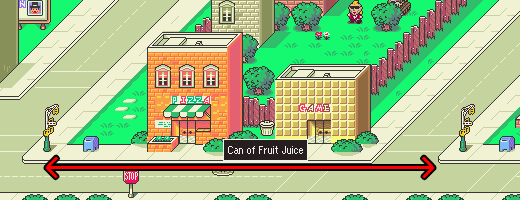
SKATE PUNK - Pizza
|


LOCATION: Onett (before beating Frank)
Suggested Area
|
The Skate Punk can be a real pain because he looks just like his pals, Yes Man Jr. and Pogo Punk. In that case,
you may find yourself frequently getting other items (especially Hamburgers). You can attempt to use SNOT to
single out one from a group, but the chances are really just the same of you finding his item if you battled
normally. The spawn rate is great, though, so you'll have no trouble finding tons of these guys. Just keep your
hopes high that the next fight'll have that coveted Pizza!
|
|
|
|
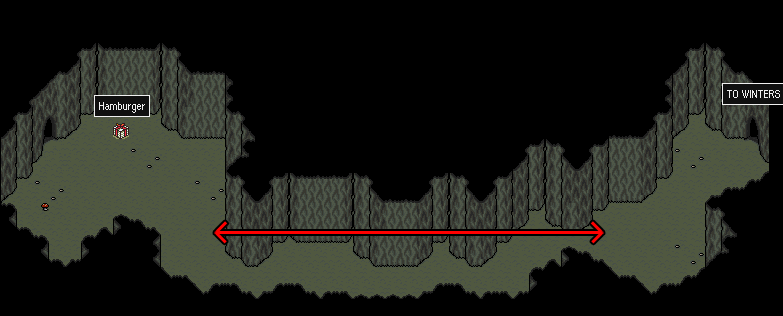
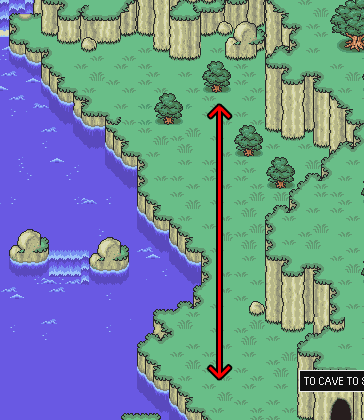
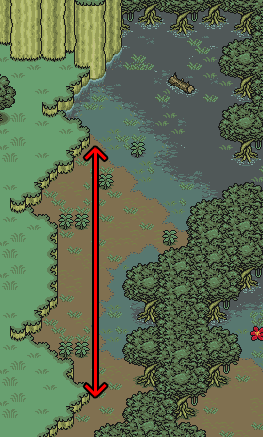
ATTACK SLUG - Bomb
|


LOCATION: Onett (Giant Step Cave); Winters (Rainy Circle Cave with Jeff only)
Suggested Area
|
Known for their travel numbers, these sticky slugs can really overlevel Ness when you're searching for them. As such,
it seems much more beneficial for Jeff to pick this item up in his stead. Not only does the experience help Jeff catch
up to Paula's and Ness's levels, but the slugs travel in far fewer numbers in Rainy Circle Cave (in 2's here compared to
Giant Step's 4-6). You can always return to Giant Step, however, if you'd rather have easy fights with everyone in the party.
|
|
|
|
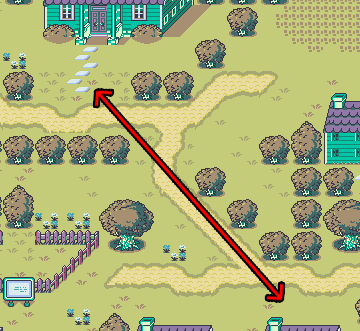
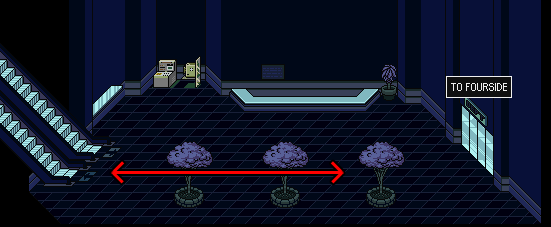
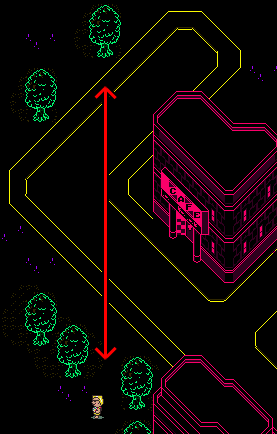
TERRITORIAL OAK - PSI caramel
|


LOCATION: Peaceful Rest Valley
Suggested Area
|
By all means, this is a foe that is easier when returned to. With just Ness and/or Paula, these sappy suckers will explode
your HP into drastic levels! The best time to return to these is when you get Poo, as he can definitely benefit from the
experience you'll gain. Be careful where you pick your spot: these trees often travel with Mobile Sprouts who can really
get in the way. If you go to the suggested area, however, you'll only ever find singular trees.
|
|
|
|
INSANE CULTIST - PSI caramel
|


LOCATION: Happy Happy Village
Suggested Area
|
While the caves around Happy Happy hold Cultists as well, I'd suggest staying in town where they roam alone. Both parties
of one and two cultists share the same chance of giving you the candy you seek. Minimize the damage you take by suiting up
with the town's best items, though in all honesty you're probably pretty beefed up by now from battling so many sharks. In
any case, the magical number you want to see is 60. That is the Offense required to OHKO a Cultist on the field with a normal
blue swirl. If you don't get the drop by then, you'll have it much easier. Otherwise, it's all a bash-fest!
Note: you may want to dispatch the Cultists in the prayer house first. There's no sense running all over town if
you're lucky enough to get it on one of the few that you're required to beat!
|
|
|
|
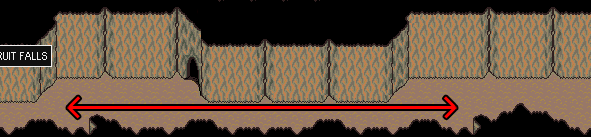
PLAIN CROCODILE - Meteornium
|


LOCATION: Grapefruit Falls
Suggested Area
|
These gators can be a real pain when you first meet them. Not only do they frequently team up with themselves, a common
battle formation is 2 Plain Crocs and 3 Red Antoids -- hardly a group to take lightly at your level! It's easiest to return
to these guys near the end of your journey. Visiting at around L:50 might sound okay, but even then they're only afraid of you
half the time, and you want the control here, as the spawing areas are all out in the open. Once you do have the
ability to easily green-swirl them, use SNOT to single them out.
|
|
|
|
VIOLENT ROACH - Secret Herb
|


LOCATION: Caves near Saturn Valley
Suggested Area
|
This is probably the easiest item to get. These roaches always travel alone and their spawn rate is fairly frequent.
It's best to return later, like when you have Poo. There's really not much else to this one, so good luck!
|
|
|
|
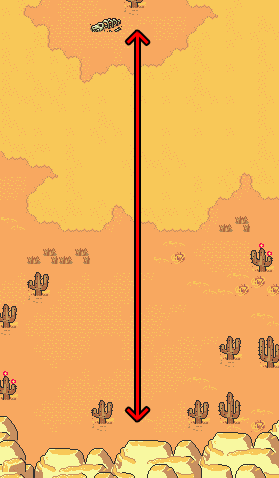
SMILIN' SPHERE - Meteornium
|


LOCATION: Dusty Dunes Desert
Suggested Area
|
Ugh, another exploding enemy. This one can be a headache at first (like so many of the others!). I usually keep this for
when I'm at max level just so you scare everything around you. The spheres mainly spawn in a diagonal line in the Desert,
starting around the Monkey Cave entrance and going northeast to right above the Montague's dig site. You'll have to watch
out for Skelpions and UFOs, but the main problem can sometimes be the spheres themselves. They have a few movement patterns.
They make skinny circles until they see you, when they quiver. At that point, they either rush in towards you or flee. In
fleeing, they'll either zig twice away and then zag back once and wait, or they'll rarely make a straight getaway. In the
former, you'll have to try and catch them on the return zag, but the easiest way to catch them is to herd them into a wall
where a green swirl is guaranteed. At max level, you'll always KO without a fight, regardless of their allies.
|
|
|
|
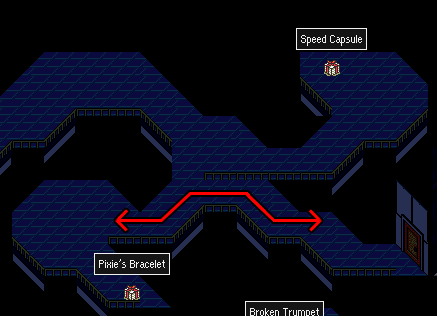
MAD TAXI - Xterminator spray
|


LOCATION: Fourside; Summers
Suggested Area
|
This one is rather easy to get if you're a little overleveled. If you follow the suggested spot, you'll find plenty of taxis.
They run in circles until they're facing you, when they'll rev forward. If you can surprise them and do some fancy footwork,
you can get green swirls even if they're not afraid of you. Otherwise, just keep pluggin'.
|
|
|
|
MUSICA - Sudden guts pill
|


LOCATION: Fourside Dept. Store
Suggested Area
|
These often-found nightmares are really quite easy with some practice. They have a radius where they can sense you. As soon
as you are registered in that area, they make a dash for that very spot. Thus, if you can figure out the length, you can
fake them out and get green swirls easy. Just take a step forward to trigger them and then touch them pretty much any other
place besides the direction they're moving. As for grouping, if you stay near the bottom of the mall, they come alone
and with only one comrade more often. Use SNOT to break up groups. This can be an annoying item just because of the coffees
that have a 1/2 chance of dropping their items. Make sure the XP matches before getting excited! The Musicas give the largest
XP of the three enemies that appear.
|
|
|
|
ENRAGED FIRE PLUG - Sudden guts pill
|


LOCATION: Moonside; Dungeon Man
Suggested Area
|
Yes, this is technically not a temporary enemy. However, it is highly recommended to score this in Moonside where it is
much easier to find them. They're hard to tell apart from Gas Pumps on the overworld, but just run from any gassy battles
and you'll be fine. They move in a circular manner like the Mad Taxis, but in smaller circles. Use this to your advantage
to try for green swirls. Keep your HP high in battles, too, as these guys are pretty dangerous.
|
|
|
|
DALI'S CLOCK - PSI caramel
|


LOCATION: Moonside; Dungeon Man
Suggested Area
|
These guys spawn all over Moonside, but I found it easiest to keep going in and out of the the Cafe. It reloads the map
faster since you don't have to walk all over and also makes it easier for green swirls (assuming your victim is close to the door).
Very rarely are the foes waiting right at the door, too, so you shouldn't have many surprise attacks, if any, from going in
and out. They always travel alone and are distinguishable from outside of battle, so the clocks are among the easier foes
to get. The best time to get them is while they're common in Moonside, but if you skip ahead, you can still find
them in Dungeon Man.
|
|
|
|
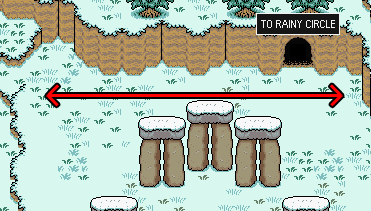
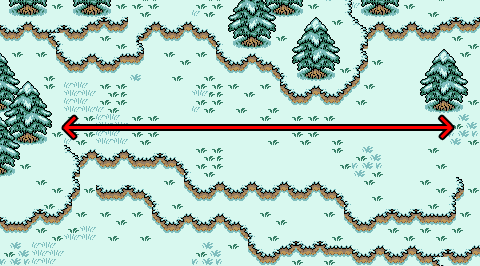
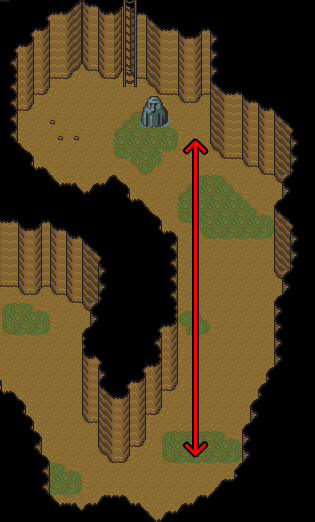
MIGHTY BEAR SEVEN - Super plush bear
|


LOCATION: Winters (Stonehenge)
Suggested Area
|
While it may be a bear, it's not a true bear to get! What you want to do for this animal is to work on it while it still finds you
as prey. Thus, it's best to get this when you first return to Winter with just Ness, Paula, and Jeff. That way, you can lull
it away from its Cave Boy friends. It's best to find a spot that will let it have a straight path towards you so you can use SNOT
to get those boys out of the picture.
|
|
|
|
MANLY FISH'S BROTHER - Horn of life
|


LOCATION: Deep Darkness
Suggested Area
|
This is, without a doubt, the toughest foe to garner an item from. These rare foes almost always travel with a plain
Manly Fish. Take into account the slowed travel in the swamp (minimizing spawn rates and killing chances of using SNOT
to single out the brother) and you've got a headache. This foe only appears in the later parts of Deep Darkness. The
Suggested Area is ideal for hunting them because its path is on dry land. However, alongside the Manly Fish there are
nearly every other foe in the swamp, so you'll have to be able to manage good SNOT skills to avoid pointless battles. This
is a foe worth saving for last, as by that time the Fish (and most everything else in the swamp) will run from you, allowing
green swirls or easy avoidance.
This is the pinnicle of this challenge, I must say, so if you get frustrated along the way, chill out and take
a break -- perseverence is key (unless you're severely lucky!).
|
|
|
|
WHIRLING ROBO - Meteotite
|


LOCATION: Winters (with everyone)
Suggested Area
|
Ugh, this guy can be a headache. It likes to travel with 2 friends frequently, the Wooly Shambler and the Lesser Mook.
Unfortunately, they also have the same out-of-battle sprites. While you can combat it early and try for its item,
it works best to return at a higher level. They'll be mostly afraid of you, giving more control with SNOT to single
one diamond enemy out. You'll also green-swirl insta-kill the foe, too, so while the chance may be lowered from confusion
out-of-battle, the process is sped up without combat.
|
|
|
|
STARMAN - Brain food lunch
|


LOCATION: Winters (Stonehenge Base)
Suggested Area
|
This spaceman travels with a wide variety of foes. As such, you have more opportunities to find his item. However, it
is only a temporary foe, disappearing one the Starman Base is beaten. Save this guy for last in case you get his item
from your search for the Sword of kings. If you have, however, a very useful tip is to take advantage of its teleportation.
If you use the suggested area, Starman from above will teleport down into your area, leaving their allies behind. It's a
quick fix to single out the Starmen and works wonders. These guys are also easy to green-swirl, so if youcan get singles,
you'll OHKO them.
|
|
|
|
STARMAN SUPER - Sword of kings
|

LOCATION: Winters (Stonehenge Base)
Suggested Area
|
Ah, the long sought after Sword of kings. There are entire guides for just this item, but there's really not much to it.
While the classic hunting ground is in the suggested area, it might be best to try for this alongside the Military Octobot's
Meteotite. Take the heirarchy into consideration: the Octobot spawns with the Super, the Super with the Starman, and the Starman
(for the most part) alone. Thus, the order can save you time in your hunt for the Base's 3 items.
In any case, treat this guy just like the normal Starman to get green swirls. You'll usually get into a battle with
allies -- you can try to use SNOT to single one out, but you may accidentally single out a normal Starman. Either way
generates the same chance for the drop. Beware of the annoying Power Robots that can sneak into battle, as they're annoying
and a tap on your HP. I suggest using Poo for recovery while you're at the base, as he can use PSI Magnet on groups of
Starmen to greatly up your stay in the Base without leaving for recovery.
|
|
|
|
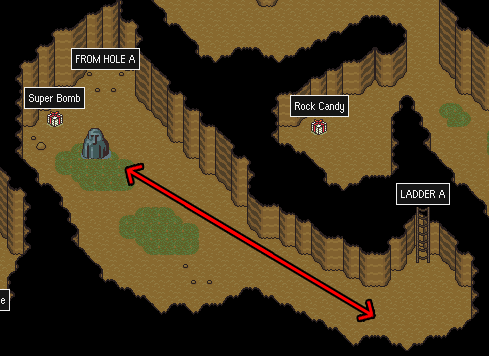
MILITARY OCTOBOT - Meteotite
|

LOCATION: Winters (Starman Base)
Suggested Area
|
Another foe that hates going solo, this 'bot is best found using SNOT. In the siggested area, you'll sometime find a group
of 2 starmen and one diamond. In that case, the diamond is always an Atomic Power Robot. Otherwise, you'll have to chance
running into Power Robots; between that fact and how deep you must travel to start the hunt, this foe can be pretty annoying
on your quest. All I wish you is luck, though a better hunting spot might be found somewhere else in that room.
|
|
|
|
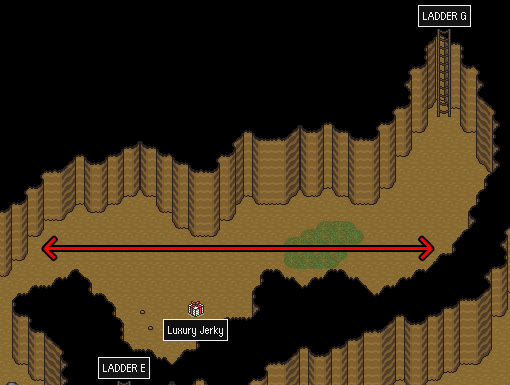
CONDUCTING SPIRIT - Brain food lunch
|


LOCATION: Lumine Hall
Suggested Area
|
This a common foe in Lumine Hall. After you beat Electro Specter, it will be terrified of you, so use that opportunity to
SNOT and green swirl them. It shouldn't give you much trouble if you've got a good sense of SNOT. You may want to try for
this alongside the Uncontrollable Sphere.
|
|
|
|
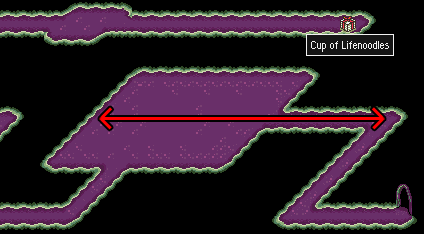
UNCONTROLLABLE SPHERE - Broken Antenna
|

LOCATION: Lumine Hall
Suggested Area
|
Again, SNOT saves the day! The explosions are nullified by green swirls, so it's all farming at this point. The suggested
area gives a good spawn rate for these orbs.
|
|
|
|
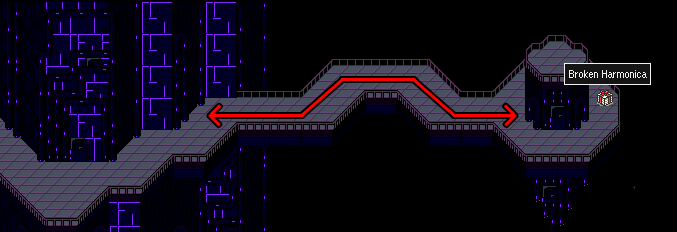
HYPER SPINNING ROBO - Meteotite
|

LOCATION: Lumine Hall
Suggested Area
|
A normally annoying enemy becomes simple if you go to the suggested area. It spawns single Spinning Robos frequently, and
SNOT can get the Orbs that also appear out of the picture. Green Swirls are freebies, so it's plugging and chugging until
your number comes up.
|
|
|
|
CHOMPOSAUR - Magic fry pan
|


LOCATION: Lost Underworld
Suggested Area
|
The best places to find this beast are after coming out of a cave, as otherwise you'd be trudging slowly through the massive
landscape. This dino can be a real pain to fight due to both its inability to be OHKO'd on the field and its Shield B that it starts
combat with. As such, it's easiest to have Paula and Poo use PSI Freeze. Jeff can use the Shield Killer to easen the battle, too.
Luckily for you, there's free healing in the area, so be sure to visit the hot springs if your HP and PP get low.
|
|
|
|
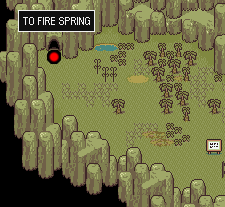
MAJOR PSYCHIC PSYCHO - Star pendant
|

LOCATION: Fire Springs
Suggested Area
|
While it is possible to fight a single MPP, they almost always travel with a friend. There's really nothing you
can do about it, though. Most caves hold them, so you'll do your hunting in the doorways, so to speak. Keep entering
and exiting to refresh your foes and hope that you get lucky enough to score this treasure quickly. This is a fantastic
spot to get everyone up to L:99, though. Beat Carbon/Diamond Dog to make them afraid of you first for green swirls. You
may want to buy Fire Pendants to guard against thier PK Fire in case you miss, though.
|
|
|
|
MECHANICAL OCTOBOT - Meteotite
|

LOCATION: Onett (invaded)
Suggested Area
|
Ugh, this guy is harder than you think to get. The reason is that he lives among an enemy that drops the same item as him:
the Evil Eye. EE's have a 1/16 chance of dropping a Meteotite. Thus, in order to verify that you get this item, you need
to stick to the parties of 1 Octobot or 1 Octobot and a Starman. Everything else cannot prove your victory, so run from anything
else. The best place to get these guys is near the library. Nothing spawns south and west of it, so you can use SNOT safely without
getting ambushed. Plus, it's rare to have a 3-foe battle there.
|
|
|
|
GHOST OF STARMAN - Goddess Ribbon
|

LOCATION: Onett (invaded); Cave of the Past
Suggested Area
|
This seems to be a commonly gotten rare item, especially by those who already have it. It has two locations
, so why not
try for this alongside the Mechanical Octobot? The manner of finding and fighting them is the same in that case. Otherwise,
you may also stumble upon it while fighting Bionic Krakens, where you may find them with SNOT in trying for a Kraken. Just
be careful of their Starstorm attacks.
|
|
|
|
BIONIC KRAKEN - Gutsy bat
|

LOCATION: Cave of the Past
Suggested Area
|
Ah, the mother of all drops. Many regard this as the hardest just because the drop is so desireable and the foe is rather
hard to find. However, using the recommended area, you'll find them easy to spot. By now, fighting them isn't an issue, and
you'll almost never get a green swirl on them, so the work is all in finding them. SNOT is the name of the game here:
only fight when a single diamond is left in the upper pathway of the recommended spot. Parties of two or more will get
stuck as you head back down to scroll them off-screen, so take your time generating the one diamond you need. Occasionally
you'll find a single Starman Super (unless you didn't SNOT right), but they don't stand a chance at your high level.
|