SCENE 25 - THE VALLEY
Location: Highway / Saturn Valley
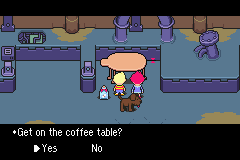
| After your landing you can go catch up with the residents in Tazmily Village if you like. But it is not necessary. Check the bouncing jar nearby to open up an underground passage. Once down there head east and you will immediately find another bounding jar. Check it and then ride the coffee table all the way east, and then north once the path forces you to turn. Welcome back to the highway. |
|
| You can choose to walk the highway or continue the ride the coffee table. The coffee table is much faster and you can avoid enemies while riding it. Whichever you decide, your destination will be the base of the Thunder Tower. It has been awhile since you have been there, but you want to first head east and then follow the road south. From there you will be where the Pork Bean slipped on those banana peels. Head north again in the nearby tunnel. Follow the road all the way north until you reach the cliffs. Head east and then south to the parking area. From there head east again until the road forces you to go south. You will arrive at the Thunder Tower base, which is now off limits. From here keep heading east until the road ends. |
|
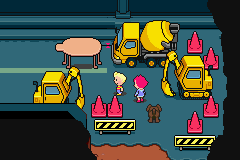
 If you head east until the road forces you to go south, and then east again, you will eventually wide back at the Clayman factory. The factory is now abandoned and is full of Security Robots. Pigmasks and tanks guard the entrance. You will not be able to reach the Thunder Tower this way.
|

|
| Welcome to Saturn Valley. This happy little place is under the Pigmasks control. There are a few presents here. A Black Collar can be found out in the open near the entrance to the valley. A Cup of Lifenoodles can be found through the cave on the right that leads to the cliffs. And finally the present in the far right corner contains a fart. Yup. |
|
| You must free the captured Mr. Satruns that are being held in their very own homes. In the first house you will walk into a group of Mr. Saturns being interrogated. This intrusion will anger the the Pigmasks and the Frightbot and they attack. They shouldn't prove to much of a problem. The second house has a single Frightbot and a present that contains a Good Kid's Shirt. The next house contains two Frightbots and presents with Strawberry Tofu and yet another fart inside. One of the Mr. Satrun's wants to give you thanks. If you say "YES" you will get a Dragonfly. If you say "NO" you will get a Silver Dragon Fly. You can get both. |
|
| In the final house you find Duster tied up. Defeat the last two Pigmask Majors and Frightbot. After the fight everyone brings Duster up to speed and he rejoins the group. Just to note, from now on you will always have Lucas, Boney, Kumatora and Duster in your party. Speak to the Mr. Saturns to learn that the next needle is to the north in the volcano. Before you go, speak to the Mr. Saturn on the right for the Saturn Valley Map. |
|
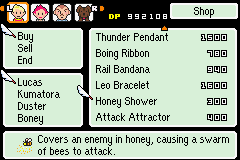
| Before you head to the volcano, check out the shop located in the first house. |
|
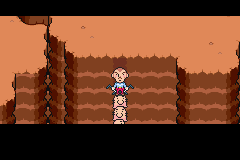
| Go through the cave on the right and follow it through the cliffs. Up here is the Item guy and yet another farting present. Check the large cliff wall to find out that it sis too solid for Duster's Wall Staples. Speak to the nearby Mr. Saturn for a stack of Mr. Saturns to give you a boost. Once Duster does his thing, head north to Fire Mountain. |
|
ITEMS LOCATED HERE:
 Black Collar くろのくびわ |
Description: Body gear for Boney. | |
|
Buy Price: 2160 DP Sell Price: - DP |
Defense +30
Offense +30 |
|
 Cup of Lifenoodles いのちのうどん |
Description: Status recovery item. | |
|
Buy Price: 1780 DP Sell Price: - DP |
Cures all status ailments and brings one character back to life with full HP
|
|
 Good Kid's Shirt よいこのシャツ |
Description: Body gear for Lucas. | |
|
Buy Price: 2000 DP Sell Price: - DP |
Defense +17
IQ +10 |
|
 Strawberry Tofu いちごとうふ |
Description: HP-recovering food. | |
|
Buy Price: 180 DP Sell Price: - DP |
Recovers about 120HP
|
|
 Silver Dragonfly ギンヤンマ |
Description: Battle item. | |
|
Buy Price: 60 DP Sell Price: - DP |
|
|
 Dragonfly オニヤンマ |
Description: Battle item. | |
|
Buy Price: 140 DP Sell Price: - DP |
|
|
 Saturn Valley Map どせいだにのちず |
Description: Key item. | |
|
Buy Price: - DP Sell Price: - DP |
|
|
ENEMIES LOCATED HERE:
 Security Robot |
|
|||||||
|
NOTE: Lower number = strong, higher number = weak
|
|
||||||
 Naughty Mushroom |
|
|||||||
|
NOTE: Lower number = strong, higher number = weak
|
|
||||||
 Filthy Attack Roach |
|
|||||||
|
NOTE: Lower number = strong, higher number = weak
|
|
||||||
 Frightbot |
|
|||||||
|
NOTE: Lower number = strong, higher number = weak
|
|
||||||
 Pigmask Major [1] |
|
|||||||
|
NOTE: Lower number = strong, higher number = weak
|
|
||||||
 Pigmask Major [2] |
|
|||||||
|
NOTE: Lower number = strong, higher number = weak
|
|
||||||


Ch. 7: Climbing Snowcap | Mother 3 Walkthrough Top | Ch. 7: Volcanic Exploration